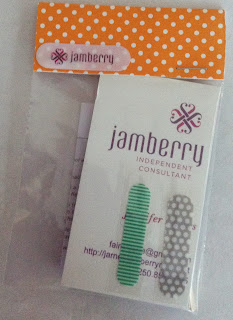
- Your guest has everything she needs (minus a cuticle pusher, scissors, and heat) to put on her samples and doesn't have to fight for supplies.
- Everything is individual and sterile eliminating any fears that guest might have about sharing nail tools. Now, she'll still have to share scissors and cuticle pushers, but those keep cross-contamination to a minimum and are easily sterilized after a party. (Microbiology really makes you think about these things.)
- They look really cute and professional

To make exactly what I do, you will need the following:
- A stapler
- Business Cards
- Samples. I cut mine into individual samples and let them drop into a small Ziploc Bag. That allows me to "randomize" them more. Yes, the samples I'm using are from the last sample set, but who cares?
- Individually wrapped alcohol swabs
- The set of 3 application instruction in your workstation under Documents. I fold them in quarters so that the Jamberry logo shows.
- Orange Sticks cut in two. I buy these by the gross at Sally's and cut them in half with wire cutters.

- A pack of 6 x 8 scrapbooking paper. I cut each piece in quarters to make them 4 x 3


- Individually-sized nail files. These are probably the hardest to find and possibly the hardest to justify. You can also use emery boards you buy at the dollar store that you cut in half like the orange sticks. If you're interested in why I invest in these puppies and want to know where to get your own, I'll put it after the instructions.


- Put a business card in your treat bag.
- Flip over the bag (so that you can see the back of the business card) and insert an alcohol swab, orange stick, and file on top of it.
- Place your instruction sheet on top of the tools. I always try to make the Jamberry logo show out the back. I'm sure that this is my obsessive-compulsive showing through, but that's what I do.
- Hold your treat bag up and slip 2 samples in front of the business card. At parties, I always have 2 different samples per person so that she can see how the different sizes allow her manicure to be customized. I also don't want to leave out a ton of samples because that's a great way to lose your samples. I never make my samples match in this method. If your guest wants a matching Jamicure, she can buy one!
- Fold one of the quarters of your scrapbook papers in half width-wise. If you hold it up to your treat bag, the long side should be the same length as your bag. Fold it on the short side.


- Pinch the very top of the bag (which is about 1/4" of empty space) between the folds of your paper.
- Staple the paper topper on your bag.
- For the final touch, you can use one of your Jamberry logo stickers from your sample sets and put it over the top of one of your staples. If you are somehow out of these stickers (seriously, I still have the old style of these things), print out some of the Mailing Labels under marketing in your workstation and use those.
Okay, short and sweet reason I buy the individual-sized nail files. I don't like how the cut emery boards look. Yes, they are an inexpensive solution, and I would highly recommend it, if you're just starting off. I also love the idea of giving every guest something to take with her in addition to whatever she buys. I feel like, someday, she'll be digging in her purse, find her tiny little file and think "Hey, I got that from that Jamberry lady, I should order some more of those!" I'm probably crazy.
For a while, I used Revlon's Box of files, but the cheapest I ever found those was $4 for 6 files which is about 67¢ a piece - way too expensive in my book. So, I scoured the internet and found NailFiles.com which has 4 different buckets of business-card sized files. When I ordered my bucket of pink files, I paid $30 for 100, including shipping and handling. That comes to 30¢ a piece, which is way more acceptable, especially if they give my customers something to remember me by. You can buy your own in the following colours:


