Showing posts with label How-To. Show all posts

Saturday, January 25, 2014

Recycle Your Business Supplies!

Now we're getting to the end of the month, and admittedly, I was starting to run out of ideas when someone posted one of the projects I'm going to talk about.  Then it hit me!  We have so many freaking boxes, envelopes, stickers, etc being sent to us that we should be recycling them as much as possible.  So, here are all the ideas I could come up with.  I'd love to hear more!

Jamberry Labels

These darn things:
Before I started making my sample packets, I had such surplus of these things that it was frustrating.  I'd get 50 with every set of samples and I didn't want to throw them away, so I kept a snack-sized Ziploc bag full of them.  I still have that baggie somewhere, and it even has old-style Jamberry labels in it.  If you don't want to use your Jamberry labels on sample bags, here are some other ideas.
  • Put them on your pens so that you have cheap "Jamberry" brand pens.
  • Put them under your return address on Jamberry mailings so your customers know what's coming.
  • Put them on items in marketing baskets to make sure everything has a logo.

Purple Envelopes

These:
We get one of these every time we make an order, have a party order sent to us, or turn in hostess rewards. Basically, any time we get wraps in the mail, you get one of those.  If you're like me, you've been tossing them in the recycle basket, but Alicia Pettus came up with this startlingly amazing solution:
Okay, seriously guys, in the blog post where she shows how to make one, she explains that she had this epiphany after seeing that bulletin board business card holders are $7.99 for 4.  Now, $2 each might not be a ton, but these are free, except for construction and they're customized to our product.  For those of you who have lengthwise business cards, make her template a little longer and the "front" of the box a little shorter.

Catalogues

If you don't know what one looks like...I don't even have words.

You can make shopping bags and envelopes out of expired catalogues.  I know we all have a few left over when the new inventory comes out and using them for shopping bags could solve 2 problems at once.  Now that we don't have gift envelopes any more, I'm sure your customers would love to have a bag to carry their purchases away in.  Unfortunately, the only video I could find that explains how to do this is from a lady who does "Passion Parties," so you might want to make sure no impressionable eyes are watching it.  I'll do my best to make my own video with Jamberry materials soon.

Shipping boxes

These:
It seems that I'm getting a shipment in one of these all the time, and they might be the things that have the most versatility.  Deanna uses them for her Book-to-Look boxes.  I use them for filing away smaller papers or pieces of inventory or business items I'm not using right now (like out of season Book-to-Looks).  Currently, I have one of the longer ones filled with old receipts and one of the shorter ones filled with customer care cards.

Homework:  Tell us how you recycle these or other business supplies.  Due tomorrow.

Tuesday, January 7, 2014

Guest Binders

If you're anything like me, you come to a party with lots you want to show your guests, but you either don't want to carry tons of paper or you don't feel like you have time to show them everything.  That's why you need guest binders!  These serve a dual purpose of being able to collect everything you want to have in your party in a neat, organized way, and also provide a solid surface for your guests to write on, if you don't have a table available.

You'll need:  Binders (optional:  clear insert in the front), page protectors, ribbon, and pens that click (the ones with lids just get lost.

First, you'll need to decide what you want to show your customers.  I usually have selections in my binders like Hostess exclusives, Inserts for the catalogues, facts about Jamberry Nails and the Sister Style Exclusive for the month.  If we have limited edition wraps that month, I put in pictures of them as well.  The best thing is that you get to decide what you want in your binder to suit your needs.

Now, take each of your items, slip them into page protectors, and clip them into the binder.  Then, put a catalogue, customer care card, and a sample set into the pocket at the front.  Tie the end of about 24" ribbon to one of the rings and then tie the other under the pocket clip of a click pen.  That way your guests don't accidentally walk off with your pens!

If you got a view binder, you can also add a colourful cover.  I put a number in the upper right hand corner so I can call people by the number on their binder.

Homework:  List 3 documents that you'll include in your guest binders.  Due tomorrow.

Saturday, January 4, 2014

Make a Party Bank!

How many times have you been in your "booking room" after a party and had someone walk in and say, "I'd love to have a party, but..." or "I'd love to have a party when..."?  These are always followed by a very good reason she can't book right this minute, but she will almost always give you a time that she'll be ready.  Here are some examples:
  • "I'd love to have a party, but we're moving right now."
  • "I'd love to have a party when my house's remodel is done."
  • "I really want to have a party, but I'm in the middle of finals."
These are great examples of women who are telling you when they want to be contacted, but they are completely useless if you don't follow up at the appropriate time.  For that reason, you should always have a Party Bank ready to take down her information at any given time.

You'll need:  A binder, 3-hole punch, hole re-inforcers, and a printer.

Print off the whole year of calendars from one of these sites (repeated from yesterday):
Punch holes in each one and reinforce the holes so you have no excuse for pages falling out.  Put them in your binder in order.

Download this file and print off at least 24 copies of it.  Punch holes and reinforce them.  Put 2 behind each month.  This is what will make up your leads for the month it is behind.  If your potential hostess gives you a date like, "I'm expecting a baby May 14," write her name down 2-3 weeks later then write her contact information in the box behind that month.


Name:__Jane Smith______________________
Phone #: __(250)555-1234_____________
Address:  __#1 Main St._________________________________________________________
Email:  _fakeemail@gmail.com______________
Alt Phone #: __________________
Hostess:  __Julie Smith_____________________
Notes:  __Expecting a baby on May 14.  It's a girl!__________________________________
___________________________________________________________________________
___________________________________________________________________________

As a bonus to my hostesses, I usually go in and request a party in this person's name so that she will still get booking credit from her friend.  This is up to you, I just like to provide this service.

Now, when June rolls around, you'll pull out your Party Bank and look at the calendar to see Jane's name listed on the 4th.  You have all of her information and are now ready to call her up and say, "Hi, Jane, my name is Sally Consultant.  We met each other at Julie's Jamberry party in January.  I remembered you were expecting a little girl.  How is she?  How's that going?  Well, as I promised, I'm giving you a call to see when you'd be ready to schedule your very own Jamberry party!"

With your Party Bank in place, you'll never have to miss an important booking opportunity again!

Homework:  Take a picture of your party bank and post it!  Due January 10.

Friday, January 3, 2014

Schedule with Style (and with colour!)

Today, I'm going to share with you how I make my calendar as helpful to me as possible.  Be forewarned, the images below are not small, but they are useful.  I utilize a highlighter method of scheduling so that I can literally glance at my planner and tell people when I have available.  Because I don't feel like taking a million pictures, I'll be using a digital calendar to do what I did with my January calendar weeks ago.  I highly recommend doing at least 3 months ahead of time so that you never have to worry about where your free time is.

Step 1:  Get a planner or print your months off from any one of these sites:
Any of these sites will let you download a calendar to print off, but you can get a professional-looking planner from anywhere.  I even got one from Dollar Tree!  Personally, my favourite comes from Party Plan Divas and I feel like it's worth every penny!

Step 2:   Get some highlighters.  I'm hoping that, by the end of this post, you understand why I colour-code my calendar.  For now, just trust me.  I bought a pack of highlighters in 6 different colours when I did this.

Step 3:  Decide which days you want to work.  Seriously, sit down with either your significant other, or your pragmatic self and say, "I cannot do this 7 days a week, 24 hours a day.  Everyone else gets days off from their 'normal' jobs, I should get days off from my fantastic one!"  Look and see if there are consistent days each week where it just doesn't make sense to work and look for a day that you get to really rest.  For me, I work Tuesday and Thursday nights and all day Saturday and Sunday.  Celestia has gymnastics every Monday, Wednesday, and Friday nights, so it makes sense for me to try to not work those nights.

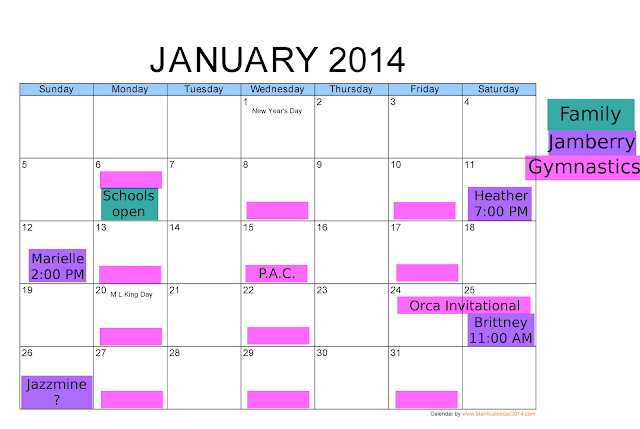
Step 4:  Determine colours to meet your needs.  This is what my list of obligations looks like.  And, yes, I put it on the right side of each month in my planner.
Family - For notes on family goings on.  Not that I have to do anything, but I should know
Jamberry - Parties, events, meetings, etc.
Gymnastics - I make a mark for every day my daughter goes to gymnastics.  I make a note for meets and Parents' Association events.
Appointments - To keep track of hair appointments, etc.
Personal - Times I have something planned that I can't schedule around.  I need to know that.
Available - Days that I can and am willing to work.

Step 5:  Go through your calendar and write down each item you already have scheduled for the month.  I usually do it in my own hierarchy of importance.
As you'll see in the following picture, I did not have the super-duper colour-coded planning calendar going when I started making appointments.  I'm currently figuring out this scheduling error.


Step 6:  Go through and mark any of the days you said you were willing to work that aren't already booked (remember, you can do 2-3 parties in a day) with your available colour.

Now, when you sit down with party guests who want to book a party with you and see what's available at a glance!

Homework:  Take a picture of your newly-organized calendar and post it to the team page.  Due tomorrow.

Wednesday, December 18, 2013

Creating Sample Bags for Parties

My current goal for my daughter's winter break is to make 50 sample sets ready for my January parties.  Then, when I complete a party, I will make as many as I used.  There are three main goals behind my sample sets:
  1. Your guest has everything she needs (minus a cuticle pusher, scissors, and heat) to put on her samples and doesn't have to fight for supplies.
  2. Everything is individual and sterile eliminating any fears that guest might have about sharing nail tools.  Now, she'll still have to share scissors and cuticle pushers, but those keep cross-contamination to a minimum and are easily sterilized after a party.  (Microbiology really makes you think about these things.)
  3. They look really cute and professional
Here is a picture of all of my supplies.  I'm going to list them all out and where you can get them and why I use them:

To make exactly what I do, you will need the following:
  1. A stapler
  2. Business Cards
  3. Samples.  I cut mine into individual samples and let them drop into a small Ziploc Bag.  That allows me to "randomize" them more.  Yes, the samples I'm using are from the last sample set, but who cares?
  4. Individually wrapped alcohol swabs 
  5. The set of 3 application instruction in your workstation under Documents.  I fold them in quarters so that the Jamberry logo shows.
  6. Orange Sticks cut in two.  I buy these by the gross at Sally's and cut them in half with wire cutters.
  7. A pack of 6 x 8 scrapbooking paper.  I cut each piece in quarters to make them 4 x 3

  8. Individually-sized nail files.  These are probably the hardest to find and possibly the hardest to justify.  You can also use emery boards you buy at the dollar store that you cut in half like the orange sticks.  If you're interested in why I invest in these puppies and want to know where to get your own, I'll put it after the instructions.
Now on to the construction method to create my sample packets.
  1. Put a business card in your treat bag.
  2. Flip over the bag (so that you can see the back of the business card) and insert an alcohol swab, orange stick, and file on top of it.
  3.  Place your instruction sheet on top of the tools.  I always try to make the Jamberry logo show out the back.  I'm sure that this is my obsessive-compulsive showing through, but that's what I do.
  4. Hold your treat bag up and slip 2 samples in front of the business card.  At parties, I always have 2 different samples per person so that she can see how the different sizes allow her manicure to be customized.  I also don't want to leave out a ton of samples because that's a great way to lose your samples.  I never make my samples match in this method.  If your guest wants a matching Jamicure, she can buy one!
  5. Fold one of the quarters of your scrapbook papers in half width-wise.  If you hold it up to your treat bag, the long side should be the same length as your bag.  Fold it on the short side.
  6. Pinch the very top of the bag (which is about 1/4" of empty space) between the folds of your paper.
  7. Staple the paper topper on your bag.
  8. For the final touch, you can use one of your Jamberry logo stickers from your sample sets and put it over the top of one of your staples.  If you are somehow out of these stickers (seriously, I still have the old style of these things), print out some of the Mailing Labels under marketing in your workstation and use those.

Okay, short and sweet reason I buy the individual-sized nail files.  I don't like how the cut emery boards look.  Yes, they are an inexpensive solution, and I would highly recommend it, if you're just starting off.  I also love the idea of giving every guest something to take with her in addition to whatever she buys.  I feel like, someday, she'll be digging in her purse, find her tiny little file and think "Hey, I got that from that Jamberry lady, I should order some more of those!"  I'm probably crazy.
For a while, I used Revlon's Box of files, but the cheapest I ever found those was $4 for 6 files which is about 67¢ a piece - way too expensive in my book.  So, I scoured the internet and found NailFiles.com which has 4 different buckets of business-card sized files.  When I ordered my bucket of pink files, I paid $30 for 100, including shipping and handling.  That comes to 30¢ a piece, which is way more acceptable, especially if they give my customers something to remember me by.  You can buy your own in the following colours:

Saturday, November 9, 2013

How to make sample business cards with clear envelopes

One of my favourite things that I do was actually an idea I saw online and took to the next level.  The concept for the cards below came from the first sample packets I saw created on the Jamberry consultant page.  I thought they were great, but a little too bulky for my everyday life.  See, in my opinion, just telling someone about your product isn't always enough, I like to have the option of giving her a sample.
If you break it down, a sample costs you 10¢, but its earning potential is limitless.  When you give a woman a sample instead of just a business card, you're giving her the opportunity to see how great your product really is.
Also, though I've seen them used with success, I don't really like sample business cards that don't have some kind of container.   My purse has a tendency to rip items apart, even if I'm being really careful.  Using clear envelopes are my way of being able to reach in for a business card before my target says no!
So now that you know my reasons, here are my tips and tricks for making the perfect tiny sample kits.

You will need 4 groups of items before you start:
  1. Business Cards.  If you're out, click that link up top and order more!
  2. Sample Cards.  Ditto, but go to your workstation.
  3. Clear Plastic envelopes.  You're going to want to go to your local craft store and find plastic envelopes that measure 2" x 3".  My personal favourite are the self-sealing envelopes, but you can use non-sealing treat bags, or zipper bags - whatever works best for you!  I'll have some suggestions for these products at the bottom.
  4. Business Card-sized Instructions.  I spent a long time making these work.  Just click this link and download the document for yourself.
 From this point, you're set to go.  I make myself four piles - one of each of the items I just listed.  For my sample cards, I cut each sample into a Ziploc bag and shake it up so that my distribution is random.  (I do this for party kits too.)  I also spend the worst 10 minutes of this project cutting apart my instruction sheet.  Still totally worth it.  Okay, here's how to put it all together:
  • Line your business card and instruction sheet up so that the instructions are pointing to the back of your business card.  It should look like the instructions are the back of your business card.  Slip them into your envelope like they're one unit.
  • Put a sample in the front of the envelope (the side with your name) and make sure you can see the pattern.
  • Seal the envelope.
 1, 2, 3 it's done!  I usually spend about an hour making 100 of these.

Can't find clear envelopes?  Here are some suggestions:
I found them at Jo-Ann Etc near the scrapbooking supplies.  They came 120 to a package.
Cardblanks.com has these for sale in both Canada and the U.S.  The B6 size is what you're looking for.
As always, Amazon has them, but not having used them, I can't say whether the 2 in x 3 in or the 2 3/4 in x 3 3/4 in will work best
Where do you find your clear envelopes?